A floor hatch is needed for access to utilities, a cellar, a manhole, plumbing or electrical inspections, and for servicing hidden components without removing the finish. A properly installed structure will withstand the load, will not creak or move within the opening, and will remain unnoticeable against the finish.
The key tasks during installation are to select the hatch type appropriate for the operating conditions, prepare a precise opening, ensure rigid support around the perimeter, and adjust the cover so that it opens safely and does not damage the finish. Below are practical installation methods and guidelines.
Installation Methods and Guidelines
- Marking: The opening is made according to the frame’s mounting dimensions, taking into account the technological gap (usually 3–10 mm – depending on the fastening system and the manufacturer’s recommendations).
- Rigid support: A load-bearing edge (concrete shelf, reinforced frame made of metal profiles/timber) is required around the perimeter. The frame cannot be supported on a floating coupler without reinforcement.
- Checking the geometry: the diagonals of the opening must match; The plane must be level, without any differences in elevation, otherwise the cover will jam or creak.
Rule: If the hatch is located in a walkway, calculate the load with a reserve and avoid installing it on the boundary of different foundations (for example, screed and wooden joists) without an expansion joint.
2) Frame installation: anchors, screws, adhesives
The fastening method depends on the base material:
- Concrete/brick: secure the frame with anchors or dowels, ensuring levelness and plane. Use point-based, rigid shims (metal/plastic) to prevent sagging.
- Wooden floors: attach to joists or reinforced framing. Be sure to check for wood play and add crossbars if necessary.
- Frame solutions: the frame is attached to a metal frame with reinforced corners and sides that bear the step load.
Rule: the frame is aligned strictly, taking into account the future flooring (adhesive, underlay, tile/laminate thickness). A height error of 2–3 mm is noticeable and can cause snagging.
3) Lid Installation and Adjustment
- Hinges and Axles: Check for smooth operation, no warping, and secure fastening.
- Gaps: the lid should not rub against the frame even after the finishing is laid; An even expansion gap is left around the perimeter.
- Securing in the closed position: use locks, latches, magnetic fasteners, or screw clamps – the choice depends on the weight of the lid and the concealment requirements.
- Stop/safety device: For hinged versions, provide an angle stop and/or a cable to prevent the lid from hitting the finish and causing injury.
Rule: if the lid is heavy, don’t skimp on the lifting mechanism (gas lift, reinforced hinges) and consider the opening direction to ensure that a person doesn’t end up in the lid’s path.
4) Integration with the flooring
The hidden hatch should “work” with the finish and its deformations:
- Tiles: it’s best to tie the lid’s seams to the general joint grid. Leave an expansion gap around the perimeter of the lid and fill it with an elastic compound (instead of rigid grout) to prevent chipping when opened.
- Laminate/engineered wood: It’s important to maintain the “floating floor” principle—design the lid to allow for expansion. A separate “cassette” is often installed on the lid, with an expansion joint around the perimeter.
- Carpet/PVC: Avoid stretching the material across the gap; The edge is carefully secured to prevent tearing when lifting.
Rule: Do not allow adhesive, grout, or sealant to get into moving parts (hinges, locks, gaps) – this is the main cause of jamming after finishing work.
Technical checks before use
Final rule: the floor hatch is installed as a load-bearing element of the floor – with precise geometry, rigid support, and consideration for the finish. This will ensure convenient access to hidden areas, and the flooring will be intact and level.
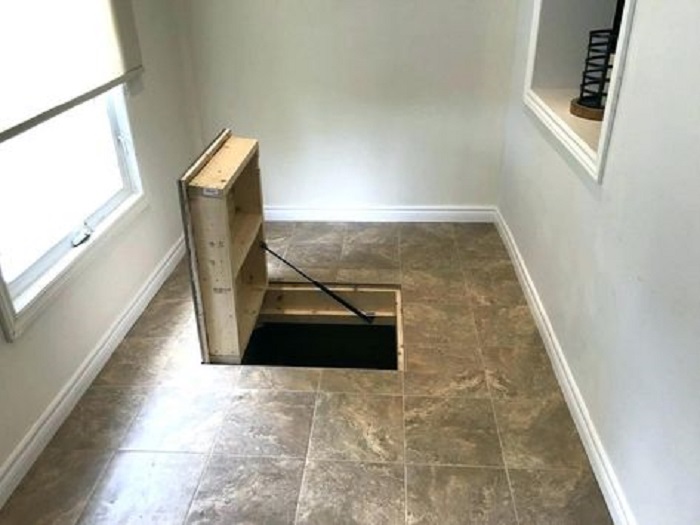
Purpose of the floor opening: access to utilities, basement, inspection room
A floor opening with a hatch is needed where it is important to maintain a level flooring, but also to have quick and safe access to hidden areas. This is a practical solution for servicing utility systems and rooms located below floor level.
A properly selected and installed hatches makes inspections regular and convenient, reducing the risk of accidents and damage to finishes during unscheduled work. The purpose of the opening determines the requirements for size, design, tightness, and load-bearing capacity.
Where and why a floor hatch is used
- Access to utilities: shut-off valves, manifolds, metering units, filters, pumps, drains, cable connections, and junction boxes – everything that requires periodic maintenance and replacement.
- Entrance to the basement/cellar: providing a passage for descent and ascent, the ability to bring in food and equipment, and providing safe and convenient openings in the living area, kitchen, and hallway, in the utility room.
- Inspection and inspection of structures: monitoring the condition of floors, subfloor space, insulation, waterproofing, identifying leaks, condensation, mold, rodents, deformations, and other hidden defects.
Bottom line: a floor hatch is an element that combines the aesthetics of the covering with technical necessity. If the opening is designed according to regulations (precise dimensions, a reliable frame, safe opening, compliance with loads and operating conditions), access to utilities, the basement, and inspection areas remains easy, and the floor remains strong and neat.